Presto Benchmarking Tutorial – TPC-H & TPC-DS on Iceberg with Google Cloud Storage (GCS)
TL;DR: What You Will Build
In this comprehensive guide, you will deploy a Presto benchmarking setup using Docker Compose. We will construct a cloud-native Data Lakehouse by mapping raw data into Apache Iceberg tables stored on Google Cloud Storage (GCS). Finally, we will execute the industry-standard TPC-H and TPC-DS benchmark suites using PBench, and visualize our query latencies in real-time using a persistent MySQL and Grafana observability stack.
Whether you are stress-testing JVM garbage collection, validating Iceberg partitioning, or evaluating Presto query performance at scale, this tutorial provides the blueprint.
Prerequisites
| Component | Role |
|---|---|
| Docker & Docker Compose | The orchestration layer that provides a consistent, isolated environment for all services. |
| Presto (Java) | The distributed SQL query engine. The Coordinator handles query planning and metadata retrieval, while the Workers perform the actual data processing. |
| Hive Metastore (HMS) | Acts as the Catalog Service. It stores the mapping between Presto table names and their physical locations on GCS. |
| PostgreSQL | The persistent storage for the Hive Metastore, ensuring that your table schemas and metadata survive container restarts. |
| Google Cloud Storage | An object storage, where your raw or Iceberg/Parquet data resides. |
| PBench | The benchmark orchestrator. It executes the TPC-H/DS suites and captures the fine-grained execution metrics for each query. Download it from here. |
| MySQL 8.0 | A dedicated database used to archive benchmark results, enabling long-term performance trend analysis. |
| Grafana | The visualization layer that transforms raw MySQL metrics into real-time, interactive performance dashboards. |
Important
GCS Service Account: Download JSON key file (gcs-key.json) withStorage Adminpermissions and save inside root directory.
Infrastructure Deployment
1. Define the Services
Create a docker-compose.yml that maps the Presto cluster to your local environment, ensuring the MySQL metrics database is mapped to a non-standard port (e.g., 3307) to avoid host conflicts.
services:

  metastore-db-presto:
    image: postgres:15
    container_name: metastore-db-presto
    hostname: metastore-db-presto
    environment:
      POSTGRES_DB: metastore
      POSTGRES_USER: hive
      POSTGRES_PASSWORD: hive_password
    volumes:
      - metastore-db-data-presto:/var/lib/postgresql/data
    healthcheck:
      test: ["CMD-SHELL", "pg_isready -U hive -d metastore"]
      interval: 5s
      timeout: 5s
      retries: 10
    networks:
      - presto-network

  hive-metastore-presto:
    image: apache/hive:3.1.3
    container_name: hive-metastore-presto
    hostname: hive-metastore-presto
    platform: linux/amd64
    depends_on:
      metastore-db-presto:
        condition: service_healthy
    environment:
      SERVICE_NAME: metastore
      DB_DRIVER: postgres
      IS_RESUME: "true"

    volumes:
      - ./hive-metastore/hive-site.xml:/opt/hive/conf/hive-site.xml:ro
      - ./hive-metastore/core-site.xml:/opt/hive/conf/core-site.xml:ro
      - ./gcs-key.json:/opt/hive/conf/gcs-key.json:ro
      - ./hive-metastore/postgresql-42.7.2.jar:/opt/hive/lib/postgresql-42.7.2.jar:ro
      - ./hive-metastore/gcs-connector-hadoop3-shaded.jar:/opt/hive/lib/gcs-connector-hadoop3-shaded.jar:ro
    ports:
      - "9083:9083"
    healthcheck:
      test: ["CMD", "bash", "-c", "cat < /dev/null > /dev/tcp/localhost/9083"]
      interval: 10s
      timeout: 10s
      retries: 15
      start_period: 30s
    networks:
      - presto-network

  presto-coordinator:
    image: prestodb/presto:latest
    container_name: presto-coordinator
    hostname: presto-coordinator
    depends_on:
      hive-metastore-presto:
        condition: service_healthy
    volumes:
      - ./coordinator/etc:/opt/presto-server/etc:ro
      - ./gcs-key.json:/etc/presto/gcs-key.json:ro
      - ./hive-metastore/core-site.xml:/etc/presto/core-site.xml:ro
      - ./presto-spill:/tmp/presto-spill
    ports:
      - "8080:8080"
    networks:
      - presto-network

  presto-worker:
    image: prestodb/presto:latest
    container_name: presto-worker
    hostname: presto-worker
    depends_on:
      - presto-coordinator
    environment:
      - GOOGLE_APPLICATION_CREDENTIALS=/etc/presto/gcs-key.json
    volumes:
      - ./worker/etc:/opt/presto-server/etc:ro
      - ./gcs-key.json:/etc/presto/gcs-key.json:ro
      - ./hive-metastore/core-site.xml:/etc/presto/core-site.xml:ro
      - ./presto-spill:/tmp/presto-spill
    networks:
      - presto-network

  mysql:
    image: mysql:8.0
    container_name: mysql
    hostname: mysql
    environment:
      - MYSQL_DATABASE=pbench
      - MYSQL_USER=pbench
      - MYSQL_PASSWORD=pbench_password
      - MYSQL_ROOT_PASSWORD=root_password
    ports:
      - "3307:3306"
    networks:
      - presto-network
    healthcheck:
      test: ["CMD", "mysqladmin" ,"ping", "-h", "localhost"]
      interval: 10s
      timeout: 5s
      retries: 10

  grafana:
    image: grafana/grafana:latest
    container_name: grafana
    hostname: grafana
    depends_on:
      mysql:
        condition: service_healthy
    ports:
      - "3000:3000"
    environment:
      - GF_SECURITY_ADMIN_PASSWORD=admin
      - GF_AUTH_ANONYMOUS_ENABLED=true
      - GF_AUTH_ANONYMOUS_ORG_ROLE=Admin
    networks:
      - presto-network

volumes:
  metastore-db-data-presto:
  mysql-data:

networks:
  presto-network:
    driver: bridge
Tip
If you would like to install Presto manually then follow this guide
To configure coordinator, create coordinator folder inside root directory and etc folder inside coordinator and add following configurations:
./coordinator/etc/config.properties
coordinator=true
node-scheduler.include-coordinator=false
discovery-server.enabled=true
discovery.uri=http://presto-coordinator:8080
http-server.http.port=8080
query.max-memory=6GB
query.max-memory-per-node=5GB
query.max-total-memory-per-node=6GB
experimental.spill-enabled=true
experimental.query-max-spill-per-node=100GB
experimental.spiller-spill-path=/tmp/presto-spill
./coordinator/etc/jvm.config
-server
-Xmx12G
-XX:+UseG1GC
-XX:G1HeapRegionSize=32M
-XX:+ExplicitGCInvokesConcurrent
-XX:+HeapDumpOnOutOfMemoryError
-XX:+ExitOnOutOfMemoryError
-XX:ReservedCodeCacheSize=512M
-Djdk.attach.allowAttachSelf=true

# Java 17 module system opens (required for Presto internals)
--add-opens=java.base/java.lang=ALL-UNNAMED
--add-opens=java.base/java.lang.invoke=ALL-UNNAMED
--add-opens=java.base/java.lang.reflect=ALL-UNNAMED
--add-opens=java.base/java.io=ALL-UNNAMED
--add-opens=java.base/java.net=ALL-UNNAMED
--add-opens=java.base/java.nio=ALL-UNNAMED
--add-opens=java.base/java.util=ALL-UNNAMED
--add-opens=java.base/java.util.concurrent=ALL-UNNAMED
--add-opens=java.base/java.util.concurrent.atomic=ALL-UNNAMED
--add-opens=java.base/sun.nio.ch=ALL-UNNAMED
--add-opens=java.base/sun.nio.cs=ALL-UNNAMED
--add-opens=java.base/sun.security.action=ALL-UNNAMED
--add-opens=java.base/sun.util.calendar=ALL-UNNAMED
--add-opens=java.security.jgss/sun.security.krb5=ALL-UNNAMED
./coordinator/etc/node.properties
node.environment=docker
node.id=coordinator-001
node.data-dir=/var/presto/data
node.location=/docker/coordinator
Create catalog folder inside etc and add following configurations:
./coordinator/etc/catalog/hive.properties
connector.name=hive-hadoop2
hive.metastore.uri=thrift://hive-metastore-presto:9083
hive.config.resources=/etc/presto/core-site.xml
hive.gcs.json-key-file-path=/etc/presto/gcs-key.json
hive.allow-drop-table=true
hive.allow-rename-table=true
hive.allow-add-column=true
hive.allow-drop-column=true
./coordinator/etc/catalog/iceberg.properties
connector.name=iceberg
iceberg.catalog.type=hive
hive.metastore.uri=thrift://hive-metastore-presto:9083
hive.config.resources=/etc/presto/core-site.xml
hive.gcs.json-key-file-path=/etc/presto/gcs-key.json
iceberg.file-format=PARQUET
iceberg.max-partitions-per-writer=5000
./coordinator/etc/catalog/tpcds.properties
connector.name=tpcds
tpcds.use-varchar-type=true
./coordinator/etc/catalog/tpch.properties
connector.name=tpch
tpch.use-varchar-type=true
To configure workers, create worker folder inside root directory and etc folder inside worker and add following configurations:
./worker/etc/config.properties
coordinator=false
discovery.uri=http://presto-coordinator:8080
http-server.http.port=8080
query.max-memory=6GB
query.max-memory-per-node=5GB
query.max-total-memory-per-node=6GB
experimental.spill-enabled=true
experimental.query-max-spill-per-node=100GB
experimental.spiller-spill-path=/tmp/presto-spill
jvm.config(Identical to the Coordinator specifications)
./worker/etc/node.properties
node.environment=docker
node.id=worker-001
node.data-dir=/var/presto/data
node.location=/docker/worker
./worker/etc/catalog/hive.properties
connector.name=hive-hadoop2
hive.metastore.uri=thrift://hive-metastore-presto:9083
hive.config.resources=/etc/presto/core-site.xml
hive.gcs.json-key-file-path=/etc/presto/gcs-key.json
./worker/etc/catalog/iceberg.properties
connector.name=iceberg
iceberg.catalog.type=hive
hive.metastore.uri=thrift://hive-metastore-presto:9083
hive.config.resources=/etc/presto/core-site.xml
iceberg.file-format=PARQUET
hive.gcs.json-key-file-path=/etc/presto/gcs-key.json
The
tpchandtpcdscatalog configurations are identical to those on the Coordinator node.
2. Configure GCS Connectivity
Presto requires a core-site.xml to handle gs:// URIs. This file must be mounted into the Presto and Hive Metastore containers. Create a metastore folder inside root directory to hold core-site.xml, hive-site.xml and required JARs.
<!--core-site.xml-->

<configuration>
<!-- Register GCS as a Hadoop filesystem -->
<property>
<name>fs.gs.impl</name>
<value>com.google.cloud.hadoop.fs.gcs.GoogleHadoopFileSystem</value>
</property>
<property>
<name>fs.AbstractFileSystem.gs.impl</name>
<value>com.google.cloud.hadoop.fs.gcs.GoogleHadoopFS</value>
</property>

<!-- Service Account Authentication -->
<property>
<name>google.cloud.auth.service.account.enable</name>
<value>true</value>
</property>
<property>
<name>google.cloud.auth.service.account.json.keyfile</name>
<value>/opt/hive/conf/gcs-key.json</value>
</property>
</configuration><!--hive-site.xml-->
<?xml version="1.0" encoding="UTF-8" standalone="no"?>
<?xml-stylesheet type="text/xsl" href="configuration.xsl"?>
<configuration>
<property>
<name>javax.jdo.option.ConnectionURL</name>
<value>jdbc:postgresql://metastore-db-presto:5432/metastore</value>
</property>
<property>
<name>javax.jdo.option.ConnectionDriverName</name>
<value>org.postgresql.Driver</value>
</property>
<property>
<name>javax.jdo.option.ConnectionUserName</name>
<value>hive</value>
</property>
<property>
<name>javax.jdo.option.ConnectionPassword</name>
<value>hive_password</value>
</property>
<property>
<name>hive.metastore.uris</name>
<value>thrift://0.0.0.0:9083</value>
</property>
<property>
<name>hive.metastore.warehouse.dir</name>
<value>/opt/hive/warehouse</value>
</property>
<property>
<name>datanucleus.autoCreateSchema</name>
<value>false</value>
</property>
<property>
<name>datanucleus.fixedDatastore</name>
<value>true</value>
</property>
<property>
<name>fs.gs.impl</name>
<value>com.google.cloud.hadoop.fs.gcs.GoogleHadoopFileSystem</value>
</property>
<property>
<name>fs.AbstractFileSystem.gs.impl</name>
<value>com.google.cloud.hadoop.fs.gcs.GoogleHadoopFS</value>
</property>
<property>
<name>fs.gs.project.id</name>
<value>Your Google Cloud Project ID</value>
</property>
<property>
<name>google.cloud.auth.service.account.enable</name>
<value>true</value>
</property>
<property>
<name>google.cloud.auth.service.account.json.keyfile</name>
<value>/opt/hive/conf/gcs-key.json</value>
</property>
<property>
<name>metastore.storage.schema.reader.impl</name>
<value>org.apache.hadoop.hive.metastore.SerDeStorageSchemaReader</value>
</property>
</configuration>Info
Hive Metastore image doesn’t come with the plugins required to talk to PostgreSQL or Google Cloud Storage. You need 2 JAR files (for PostgreSQL and GCS Connectors), download them from here
3. Mapping Schemas & External Tables
To query raw TPC-H/DS data stored as .tbl or .dat files, we must first “bridge” the physical storage to Presto’s SQL engine. We do this by creating a Raw Staging Layer using the Hive connector. This layer maps the existing files as external tables without moving or duplicating any data. Raw data has been generated through official TPC tools using dbgen and dsdgen.
We use a dedicated schema with the _raw suffix to clearly separate our staging metadata from our optimized production data.
-- Create a persistent schema for raw staging metadata
CREATE SCHEMA IF NOT EXISTS hive.tpch_sf10_raw
WITH (location = 'gs://data_benchmarking/raw/tpch_sf10_raw/');
We create an External Table that points directly to the GCS bucket.
Note: In this staging layer, we define all columns as VARCHAR. We will perform strict type casting later during the migration to Iceberg.
-- Create an external table pointing to your GCS location
CREATE TABLE hive.tpch_sf10_raw.nation_raw (
    n_nationkey  VARCHAR,
    n_name       VARCHAR,
    n_regionkey  VARCHAR,
    n_comment    VARCHAR
)
WITH (
    format = 'CSV',
    csv_separator = '|',
    external_location = 'gs://data_benchmarking/raw/tpch_sf10/nation/'
);
4. The Iceberg Layer
Once our raw data is queryable, we migrate it into Apache Iceberg. This transforms the data into an optimized, columnar Parquet format, adds ACID compliance, and enables Presto’s advanced performance features like hidden partitioning and time-travel.
Unlike the raw layer, this schema uses the Iceberg connector and will store its metadata in the Hive Metastore.
-- Create the Iceberg schema
CREATE SCHEMA IF NOT EXISTS iceberg.tpch_sf10
WITH (location = 'gs://data_benchmarking/iceberg/tpch_sf10/');
Now we define the table with the actual data types (Integers, Decimals, etc.) required for high-speed analytical joins.
-- Migrate to Iceberg (with Casting)

CREATE TABLE iceberg.tpch_sf10.nation
WITH (format = 'PARQUET')
AS SELECT
    CAST(n_nationkey AS BIGINT) AS n_nationkey,
    n_name,
    CAST(n_regionkey AS BIGINT) AS n_regionkey,
    n_comment
FROM hive.tpch_sf10_raw.nation_raw;
Scanning flat tables at SF-10, SF-100 or SF-1000 will result in massive GCS costs and slow queries. To prevent this, we use Iceberg Partitioning directly in the WITH clause using a bucketing strategy.
-- Example
CREATE TABLE iceberg.tpch_sf10.lineitem
WITH (
    format = 'PARQUET',
    location = 'gs://data_benchmarking/iceberg/tpch_sf10/lineitem/',
    partitioning = ARRAY['month(l_shipdate)']
)
AS
SELECT
    CAST(l_orderkey AS BIGINT) AS l_orderkey,
    CAST(l_partkey AS BIGINT) AS l_partkey,
    CAST(l_suppkey AS BIGINT) AS l_suppkey,
    CAST(l_linenumber AS INTEGER) AS l_linenumber,
    CAST(l_quantity AS DECIMAL(15,2)) AS l_quantity,
    CAST(l_extendedprice AS DECIMAL(15,2)) AS l_extendedprice,
    CAST(l_discount AS DECIMAL(15,2)) AS l_discount,
    CAST(l_tax AS DECIMAL(15,2)) AS l_tax,
    l_returnflag,
    l_linestatus,
    CAST(l_shipdate AS DATE) AS l_shipdate,
    CAST(l_commitdate AS DATE) AS l_commitdate,
    CAST(l_receiptdate AS DATE) AS l_receiptdate,
    l_shipinstruct,
    l_shipmode,
    l_comment
FROM hive.tpch_sf10_raw.lineitem_raw;
The final, most important step for benchmarking is to collect statistics. This allows Presto’s Cost-Based Optimizer (CBO) to choose the most efficient join order.
-- Collect row counts and column distributions
ANALYZE iceberg.tpch_sf10.nation;
Info
Repeat Steps 3 and 4 for all the remaining tables in TPC-H and TPC-DS
5. Automated Benchmarking with PBench
To get repeatable, professional results, we use PBench, a high-performance benchmark orchestrator that automates query execution and captures detailed performance metrics. PBench doesn’t just print results to the console; it persists them in a MySQL database. This allows us to compare “Run A” vs “Run B” weeks later.
Download the PBench tar file and unpack it into your local project root directory.
Create mysql.json file inside pbench directory and paste following config
{
  "username": "pbench",
  "password": "pbench_password",
  "server": "127.0.0.1:3307",
  "database": "pbench"
}
Next, we create a JSON manifest that tells PBench which catalog to use, which schema to target, and which SQL files to execute. Notice that we also enable save_json and save_output for deep debugging.
Example tpch_sf10_iceberg.json:
{
  "name": "tpch_sf10_iceberg",
  "description": "TPC-H SF-10 Benchmarking on Iceberg",
  "catalog": "iceberg",
  "schema": "tpch_sf10",
  "runs": 1,
  "save_json": true,
  "save_output": true,
  "query_files": [
    "benchmarks/tpch/queries/query_01.sql",
    "benchmarks/tpch/queries/query_02.sql"
    // ... continues through query_22.sql
  ]
}
Example tpcds_sf10_iceberg.json:
{
  "name": "tpcds_sf10_iceberg",
  "description": "TPC-DS SF-10 Benchmarking on Iceberg",
  "catalog": "iceberg",
  "schema": "tpcds_sf10",
  "runs": 1,
  "save_json": true,
  "save_output": true,
  "query_files": [
    "benchmarks/tpc-ds/queries/query_01.sql",
    "benchmarks/tpc-ds/queries/query_02.sql",
	// ... continues through query_99.sql
  ]
}
Run the following command to start the suite. PBench will sequentially execute every query, measure the wall time, and stream the results directly to your MySQL container.
#For TPC-H Benchmarking
./pbench run --mysql mysql.json tpch_sf10_iceberg.json#For TPC-DS Benchmarking
./pbench run --mysql mysql.json tpcds_sf10_iceberg.jsonpbench will also save the raw data results and the execution statistics locally into a new folder (e.g., pbench/tpcds_sf10_iceberg_260429-XXXXXX/).
Important
Always discard the results of the first run. The JVM needs time to warm up and JIT-compile the execution paths. Change the JSON to"runs": 3or"runs": 5
6. Real-Time Observability with Grafana
Because pbench automatically streams our execution metrics into MySQL, we can use Grafana to visualize our cluster’s performance in real-time. Our Docker Compose stack automatically provisions a Grafana instance alongside our MySQL metrics database.
- Navigate to
http://localhost:3000(Default login:admin/admin). - Go to Connections > Data Sources and add a new MySQL datasource.
- Configure the connection using the internal Docker network:
- Host:
mysql:3306 - Database:
pbench - User:
pbench - Password:
pbench_password
- Host:
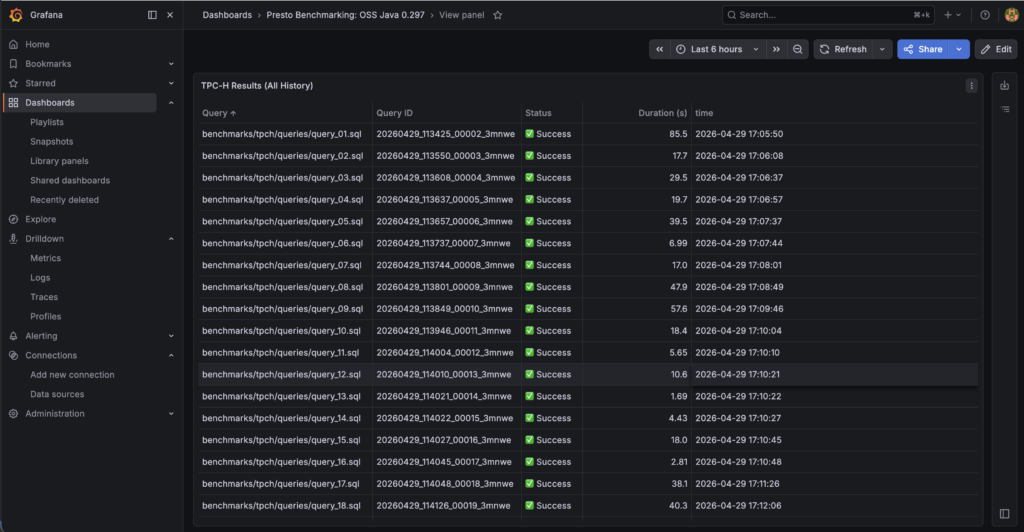
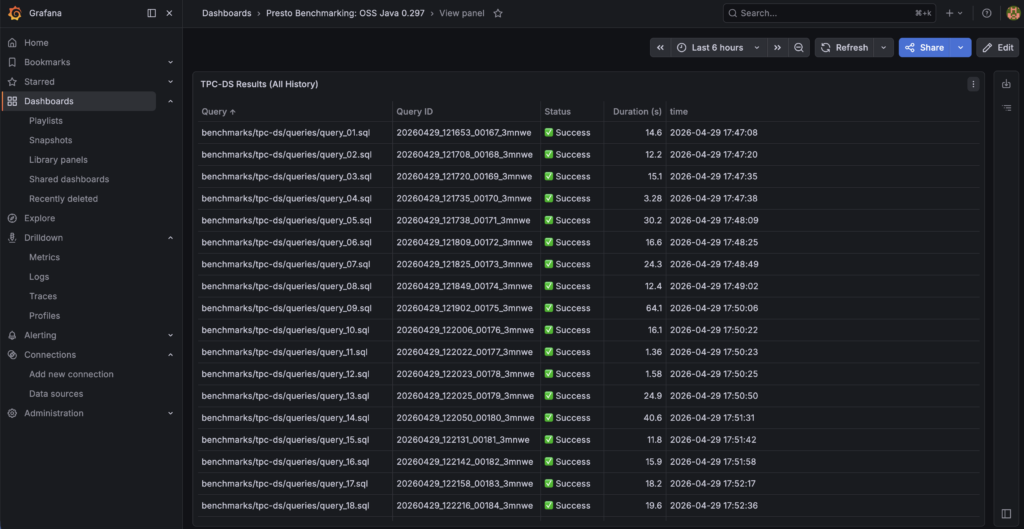
Success
Benchmarking stats have been recorded successfully
7. Troubleshooting
When running complex analytical queries at scale, you are bound to hit the physical limits of your hardware or data anomalies. Here is how you can solve the biggest challenges in this architecture:
TPC-DS Query 72 involves massive multi-way joins that can easily exceed physical RAM.
- The Fix: We enabled disk spilling. By mounting a
/tmp/presto-spillvolume to our Docker containers and addingexperimental.spill-enabled=trueto ourconfig.properties, Presto safely offloads intermediate join data to disk rather than crashing.
Legacy TPC-DS data generators often produce sparse data that results in a DIVISION_BY_ZERO SQL error on Query 90.
- The Fix: Instead of failing the benchmark, we wrapped the mathematical operations in the SQL file with a safe division wrapper:
COALESCE(NULLIF(value, 0), 1).
8. Resources
- GitHub Repo Link
- Check out Presto Documentation on Iceberg Connector and Hive Connector for more information. Join Presto Slack Community