
 16.5K GitHub Stars
Deploy Presto on Kubernetes using Helm: Query S3 Data with Hive Metastore
Deploying Presto on Kubernetes transforms this powerful engine into a cloud-native, resilient service that automatically handles failures, scales seamlessly, and optimizes resource utilization. When combined with Helm charts, the deployment becomes standardized, version-controlled, and easily reproducible across environments.
This comprehensive guide will walk you through deploying a production-capable baseline Presto cluster on Kubernetes using the official Presto Helm charts, covering everything from basic setup to advanced concepts like high availability, autoscaling, and monitoring integration.
Prerequisites: Setting Up Your Environment
Before diving into deployment, ensure your environment meets these requirements:
Required Software Versions
- Kubernetes Cluster: Version 1.30+ (EKS, GKE, AKS, local machine or on-premise)
- Helm 3: Latest stable version (3.14+ recommended)
- kubectl: Configured to communicate with target cluster
- Container Runtime: Docker Desktop / OrbStack or any container management tool
Infrastructure Requirements
- Minimum Cluster Resources: 4 CPU cores, 16GB RAM for basic cluster
- Production Cluster: 8+ CPU cores, 32GB+ RAM for workloads
- Network: Pod-to-Pod communication enabled
- Storage: Persistent storage available (optional but recommended)
Knowledge Prerequisites
- Basic understanding of Kubernetes concepts (Pods, Services, ConfigMaps, Secrets)
- Familiarity with Presto architecture (Coordinator, Worker, Catalogs)
- Experience with YAML configuration and Helm basics
Presto Kubernetes Architecture: Components and Deployment Modes
Before deployment, let’s understand the key components:
Core Architecture Components
- Coordinator Pod: The brain that parses SQL statements, plans queries, and manages worker nodes
- Worker Pods: The compute engines that execute tasks and process data
- Discovery Service: Headless service enabling worker-to-coordinator communication
- ConfigMaps: Store configuration files (config.properties, jvm.config, log.properties)
- Catalog ConfigMaps: Define data source connectors (Hive, MySQL, PostgreSQL, etc.)
- Secrets: Securely store credentials and sensitive configuration
- Services: Expose Presto endpoints internally and externally

Deployment Modes
The Presto Helm chart supports three deployment modes:
- Single Mode: One pod acting as both coordinator and worker (ideal for development)
- Cluster Mode: Separate coordinator and worker pods (standard production setup)
- HA Cluster Mode: Multiple active coordinator pods managed by a shared resource manager (high availability)
Step-by-Step Deployment Guide
Step 1: Setting up the Presto Helm Chart on Kubernetes (Local)
Create an organized workspace for your Presto deployments:
mkdir -p ~/presto-k8s
cd ~/presto-k8s
Create a dedicated namespace for Presto to isolate resources:
#Verify Installation first
kubectl version --client
helm version

# Create a dedicated namespace
kubectl create namespace sql-query-engine

# Verify namespace
kubectl get namespaces
Add the official Presto Helm repository:
# Add Presto Helm repository
helm repo add presto https://prestodb.github.io/presto-helm-charts

# Update repository to fetch latest charts
helm repo update

# Verify repository
helm repo list

#Pull the chart to inspect the default configurations
helm pull presto/presto --untar
tree presto
Understanding the Helm Chart Structure:
presto-helm-charts/
├── charts/
│   └── presto/
│       ├── Chart.yaml              # Chart metadata
│       ├── values.yaml             # Default configuration
│       ├── README.md               # Chart documentation
│       ├── .helmignore             # Files to ignore
│       └── templates/              # Kubernetes manifests
│           ├── configmap-catalog.yaml
│           ├── configmap-coordinator.yaml
│           ├── configmap-resource-manager.yaml
│           ├── configmap-worker.yaml
│           ├── deployment-coordinator.yaml
│           ├── deployment-resource-manager.yaml
│           ├── deployment-worker.yaml
│           ├── ingress.yaml
│           ├── NOTES.txt
│           ├── service-discovery.yaml
│           ├── service.yaml
│           └── serviceaccount.yaml
├── DEVELOPMENT.md
├── README.md
└── LICENSE
Create a my-presto-config.yaml file in the root directory with minimal custom configurations for quick deployment:
# my-presto-config.yaml

mode: cluster

coordinator:
  replicas: 1
  resources:
    requests:
      memory: "2Gi"
      cpu: "1"
    limits:
      memory: "4Gi"
      cpu: "2"
  jvm: |-
    -server
    -Xmx2G
    -XX:+ExitOnOutOfMemoryError
    -Djdk.attach.allowAttachSelf=true
    --add-opens=java.base/java.lang=ALL-UNNAMED
    --add-opens=java.base/java.io=ALL-UNNAMED
    --add-opens=java.base/java.util=ALL-UNNAMED
    --add-opens=java.base/java.net=ALL-UNNAMED

worker:
  replicas: 2
  resources:
    requests:
      memory: "2Gi"
      cpu: "1"
    limits:
      memory: "4Gi"
      cpu: "2"
  jvm: |-
    -server
    -Xmx2G
    -XX:+ExitOnOutOfMemoryError
    -Djdk.attach.allowAttachSelf=true
    --add-opens=java.base/java.lang=ALL-UNNAMED
    --add-opens=java.base/java.io=ALL-UNNAMED
    --add-opens=java.base/java.util=ALL-UNNAMED
    --add-opens=java.base/java.net=ALL-UNNAMED

# To connect data sources
catalog:
  tpch: |-
    connector.name=tpch
  hive: |-
    connector.name=hive-hadoop2
    hive.metastore.uri=thrift://hive-metastore:9083
    hive.s3.aws-access-key=<YOUR_ACCESS_KEY>
    hive.s3.aws-secret-key=<YOUR_SECRET_KEY>
    hive.s3.endpoint=https://<YOUR_END_POINT>
    hive.s3.path-style-access=true
    hive.s3.ssl.enabled=true
Now, let’s deploy Presto to local machine with custom configuration. It will take about 2-3 minutes for the images to pull and the containers to start.
helm install my-presto presto/presto -f my-presto-config.yaml --namespace sql-query-engineTo apply any future configuration changes, you simply run the Helm upgrade command:
helm upgrade my-presto presto/presto -f my-presto-config.yaml -n sql-query-engineCheck the status of the pods.
kubectl get pods --namespace sql-query-engineExpected Output:
NAME                                    READY   STATUS    RESTARTS   AGE

my-presto-coordinator-886bc4b5f-wsj6t   1/1     Running   0          59m

my-presto-worker-7b5698569b-bg664       1/1     Running   0          59m

my-presto-worker-7b5698569b-wdfcn       1/1     Running   0          59m
The above status confirms that Presto coordinator and workers are running in the background and presto server has started successfully.
Since the cluster is running inside Kubernetes (an isolated network), you need to create a tunnel to access the Web UI from our browser.
kubectl port-forward svc/my-presto 8080:8080 -n sql-query-engineLeave this terminal window running. Do not close it

Run the below command to execute queries using presto-cli
kubectl exec -it my-presto-coordinator-67565444dd-rvrt7 --namespace sql-query-engine -- presto-cli
Step 2 : Scaling Your Deployment (Adding More Workers)
To add more workers (scale out), edit replicas in my-presto-config.yaml file and change it to any number under worker section
worker:
  replicas: 5  # <-- Update this
# ... rest of config stays the same#Apply the Update
helm upgrade my-presto presto/presto -f my-presto-config.yaml -n sql-query-engine
#Check the pod status
kubectl get pods -n sql-query-engine
NAME READY STATUS RESTARTS AGE
my-presto-coordinator-67565444dd-rvrt7 1/1 Running 0 91m
my-presto-worker-56f9fd8b84-4rm6v 1/1 Running 0 103s
my-presto-worker-56f9fd8b84-7l2lr 1/1 Running 0 91m
my-presto-worker-56f9fd8b84-89zd7 1/1 Running 0 91m
my-presto-worker-56f9fd8b84-8srz2 1/1 Running 0 103s
my-presto-worker-56f9fd8b84-ts4x5 1/1 Running 0 103s
Step 3 : Configuring the Apache Hive Metastore for S3
You can use any modern cloud storage provider (like AWS S3, Wasabi, or MinIO). This layer serves as the massive, scalable foundation where your actual raw data files (CSV, JSON, Parquet) physically reside.
Create an S3 bucket in your preferred region, and set up a dedicated directory inside it to serve as the storage location for your data files.
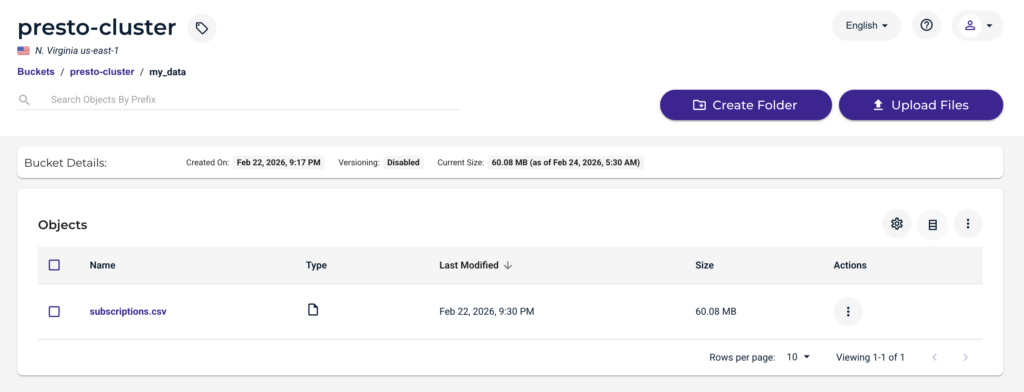
Set up hive-metastore.yaml and initialize a PostgreSQL database to serve as the centralized metadata catalog for the Presto cluster.
# 1. POSTGRES DEPLOYMENT (Holds the Data)
apiVersion: apps/v1
kind: Deployment
metadata:
  name: hive-metastore-db
  namespace: sql-query-engine
spec:
  replicas: 1
  selector:
    matchLabels:
      app: hive-metastore-db
  template:
    metadata:
      labels:
        app: hive-metastore-db
    spec:
      containers:
      - name: postgres
        image: postgres:13
        env:
        - name: POSTGRES_DB
          value: metastore
        - name: POSTGRES_USER
          value: hive
        - name: POSTGRES_PASSWORD
          value: hivepassword
        ports:
        - containerPort: 5432
---
# 2. POSTGRES SERVICE
apiVersion: v1
kind: Service
metadata:
  name: hive-metastore-db
  namespace: sql-query-engine
spec:
  ports:
  - port: 5432
  selector:
    app: hive-metastore-db
---
# 3. HIVE CONFIGURATION (With S3 Keys)
apiVersion: v1
kind: ConfigMap
metadata:
  name: hive-config
  namespace: sql-query-engine
data:
  hive-site.xml: |
    <configuration>
      <property>
        <name>javax.jdo.option.ConnectionURL</name>
        <value>jdbc:postgresql://hive-metastore-db:5432/metastore</value>
      </property>
      <property>
        <name>javax.jdo.option.ConnectionUserName</name>
        <value>hive</value>
      </property>
      <property>
        <name>javax.jdo.option.ConnectionPassword</name>
        <value>hivepassword</value>
      </property>
      <property>
        <name>fs.s3a.access.key</name>
        <value>YOUR_ACCESS_KEY</value>
      </property>
      <property>
        <name>fs.s3a.secret.key</name>
        <value>YOUR_SECRET_KEY</value>
      </property>
      <property>
        <name>fs.s3a.endpoint</name>
        <value>YOUR_ENDPOINT</value>
      </property>
      <property>
        <name>fs.s3a.path.style.access</name>
        <value>true</value>
      </property>
    </configuration>
---
# 4. HIVE METASTORE DEPLOYMENT
apiVersion: apps/v1
kind: Deployment
metadata:
  name: hive-metastore
  namespace: sql-query-engine
spec:
  replicas: 1
  selector:
    matchLabels:
      app: hive-metastore
  template:
    metadata:
      labels:
        app: hive-metastore
    spec:
      # Shared Volume for Driver Jar
      volumes:
      - name: hive-config
        configMap:
          name: hive-config
      - name: lib-share
        emptyDir: {}

      initContainers:
      # A. Download Postgres Driver + AWS/S3 JARs
      - name: download-driver
        image: python:3.9-slim
        resources:
          requests:
            cpu: 100m
            memory: 128Mi
        command: ["python3", "-c"]
        args:
          - |
            import urllib.request
            files = [
              ('https://jdbc.postgresql.org/download/postgresql-42.2.18.jar', '/lib-share/postgresql-42.2.18.jar'),
              ('https://repo1.maven.org/maven2/org/apache/hadoop/hadoop-aws/3.3.4/hadoop-aws-3.3.4.jar', '/lib-share/hadoop-aws-3.3.4.jar'),
              ('https://repo1.maven.org/maven2/com/amazonaws/aws-java-sdk-bundle/1.12.367/aws-java-sdk-bundle-1.12.367.jar', '/lib-share/aws-java-sdk-bundle-1.12.367.jar'),
            ]
            for url, dest in files:
              print(f'Downloading {url}...')
              urllib.request.urlretrieve(url, dest)
              print('Done.')
        volumeMounts:
        - name: lib-share
          mountPath: /lib-share

      # B. Initialize Schema (Run as ROOT to allow copying to /opt/hive/lib)
      - name: init-schema
        image: apache/hive:4.0.0
        securityContext:
          runAsUser: 0
        command: ["sh", "-c"]
        args:
          - "cp /lib-share/*.jar /opt/hive/lib/ && (/opt/hive/bin/schematool -dbType postgres -info || /opt/hive/bin/schematool -dbType postgres -initSchema)"
        volumeMounts:
        - name: hive-config
          mountPath: /opt/hive/conf/hive-site.xml
          subPath: hive-site.xml
        - name: lib-share
          mountPath: /lib-share

      containers:
      # C. Run Metastore Service (Run as ROOT to allow copying to /opt/hive/lib)
      - name: metastore
        image: apache/hive:4.0.0
        securityContext:
          runAsUser: 0
        command: ["sh", "-c"]
        args:
          - "cp /lib-share/*.jar /opt/hive/lib/ && /opt/hive/bin/hive --service metastore"
        ports:
        - containerPort: 9083
        volumeMounts:
        - name: hive-config
          mountPath: /opt/hive/conf/hive-site.xml
          subPath: hive-site.xml
        - name: lib-share
          mountPath: /lib-share
---
# 5. HIVE METASTORE SERVICE
apiVersion: v1
kind: Service
metadata:
  name: hive-metastore
  namespace: sql-query-engine
spec:
  ports:
  - port: 9083
    targetPort: 9083
  selector:
    app: hive-metastore
In production, always use Kubernetes Secrets or cloud-native identity mechanisms (IRSA) to store the keys.
# To apply above configuration, run the below command:

kubectl apply -f hive-metastore.yaml

# Check status of the pods

kubectl get pods -n sql-query-engine
Expected Output:
NAME                                       READY   STATUS    RESTARTS   AGE

hive-metastore-5b964db94-dg2wm             1/1     Running   0          102m

hive-metastore-db-658f9d4546-89n8l         1/1     Running   0          151m

my-presto-coordinator-68b85f9566-rt5jw     1/1     Running   0          138m

my-presto-worker-66bb49fb6b-bs6f7          1/1     Running   0          138m

my-presto-worker-66bb49fb6b-gvtwd          1/1     Running   0          138m
Let’s confirm that hive registered as a catalog with Presto.

Let’s create the schema, if it doesn’t already exist.
CREATE SCHEMA IF NOT EXISTS hive.default;It’s time to connect Presto to actual S3 data, We will use External Tables. When we define an External Table, we are simply telling the Hive Metastore to draw a map or an index card.
Run the following SQL command through Presto-UI or CLI:
CREATE TABLE IF NOT EXISTS hive.default.subscriptions (
  user_id VARCHAR,
  phone_number VARCHAR,
  subscription_type VARCHAR,
  region VARCHAR,
  subscription_date VARCHAR,
  source VARCHAR
) WITH (
  format = 'CSV',
  external_location = 's3a://presto-cluster/my_data/'
);
This deployment uses an ephemeral, stateless PostgreSQL database. If the database pod restarts, you will simply need to re-run your
CREATE TABLEscripts to map your S3 data back into Presto. For permanent metadata retention, attach a PersistentVolumeClaim (PVC) to the Postgres container.
Step 4: Querying S3 Data
Run the command to query the data:
SELECT subscription_type, COUNT(*) as total_users
FROM hive.default.subscriptions
GROUP BY subscription_type
ORDER BY total_users DESC limit 100
Presto executed the query successfully and delivered the aggregated result.
Troubleshooting Common Issues
Memory Thrashing (OOMKilled), CrashLoopBackOff
- Reason: Presto Coordinator is requesting more RAM than your Kubernetes node has available, or the Java Heap size (
-Xmx) is set incorrectly. - Fix: Check your
resources.limits.memory. If you set it to2Gi, you cannot set your Java Heap (-Xmx) to2G. The JVM needs overhead room.
Error: Connector hive not found
- Reason: This issue almost always stems from mixing up PrestoDB configuration syntax with Trino.
- Fix: Change the connector name to exactly:
connector.name=hive-hadoop2
Summary
By deploying Presto on Kubernetes alongside the Apache Hive Metastore, you can seamlessly query terabytes of external data stored securely in S3-compatible storage. By embracing a stateless metadata catalog mapped to external tables, you now have a highly resilient, cost-effective, and containerized analytics engine ready for production.
Refer to Presto Documentation on Presto Helm Deployment and Hive Connector for more information.